
Community Courses
Following courses are built and delivered for community building and personal growth.
These courses are offered by respective professionals.
General Courses
Food Handler Course Details
| Course Length | Approximately 6 hours, 10 lessons + practice quiz |
|---|---|
| Exam Attempts | Unlimited Exam Attempts – No additional charges to retake the exam! *** conditions apply! |
| Percentage Required To Pass | 70% |
| Audio/Visual Format | Fully narrated interactive presentation, with audio, video, photos, games and end of module quizzing. Over 60 resources & videos including Provincial Legislation and informative colour workplace posters. |
| Certificate Name & Certificate Validity | Food Handlers Certification.
Valid in all Canadian Provinces & Territories for 5 Years from Date of Issue. |
| Topics Covered | COVID-19 Awareness for Foodservice, Food Safety in the News, Laws, Regulation, and Inspection, How Food Can Make Us Sick (Hazards in Food), Employee and Visitor Hygiene, Facilities and Equipment, Purchasing, Receiving, and Storage, Preparing and Serving Safe Food (time & temp control), Cross-Contamination, Sanitation, Waste & Pest Control, Your Food Safety Program and HACCP. |
| Certificate Provided | You will receive your printable digital certificate & wallet card within minutes of successful exam completion, via email. |
| Training Approved By | Ontario, British Columbia, Manitoba, Nova Scotia, Quebec, Prince Edward Island, Saskatchewan, New Brunswick, Yukon, Nunavut, Newfoundland and Labrador, Northwest Territories. |
| Additional Information | Our course works on most devices including laptops, desktops, tablets, iPads and most newer smartphones. Google Chrome or Mozilla Firefox are the recommended web browsers. Group Discounts are available for large volume purchases. |
| Additional Steps | Please ensure the information you fill at checkout is correct and in the correct capitalization. Enter your name as it appears on your Government Issued Photo Identification. This info will appear on your certificate as inputted by the learner. Certificate change requests are subject to additional fees. |
| Course Access Rights | Students will have 30 days from the date of purchase to complete their course and exam.
**** |
| Exam | Complete the exam online, at home at any time, immediately after completing the course. This will be done under the supervision of an online proctor.
Learners will have 60 minutes to complete the exam. *In order to complete the exam online you will need a working webcam and microphone. Exams can be completed from any device including tablets and mobile phones. * Valid Photo ID is required to complete the exam. ***If you fail your exam you can retake it as often as needed without paying any additional fees as long as you follow all exam proctoring rules. Failing to follow all exam proctoring rules will result in additional exam access charges of $15 per attempt. *** |
| Refunds | Refunds must be requested prior to student starting course. No refunds will be issued if you have started your course. To receive a refund, please forward your electronic receipt to our customer service department: info@alphalifetrainers.ca with the subject heading: Online Course Refund. State the reason for your request. Refund requests will not be accepted after the student has started the course, or if the course has expired. All Group purchase sales are considered final. |
| Course Length | Approximately 2 hours | ||
| Audio/Visual Format | In Person | ||
| Topics Covered | Income Tax Basics Your income is the total amount of money you earn in a year. Some sources of income include earnings from employment, interest, dividends and rental properties. A percentage of your total income is collected and shared by the Government of Canada and your provincial government, to help pay for public services like health care, infrastructure and education. The more you earn, the higher percentage of income tax you pay. The percentage you pay depends on your tax “bracket” (level of income). Taxation rates vary from province to province and year to year. There are five federal tax brackets.a) Income at the lower end (below $46,000) is taxed at 15 per cent, while at the higher end (over $205,000) is taxed at 33 per cent.b) The federal tax brackets and rates are revised annually. c) You are entitled to lessen the amount of income tax you pay, through deductions and tax credits.Deductions:Expenses you can subtract from your total income to enter a lower tax bracket.Examples include union/professional dues, child care expenses, spousal support payments and Registered Retirement Savings Plan (RRSP) contributions. Tax credits: Allowances offered by the government to reduce tax owing. Everyone is entitled to a Basic Personal Amount; other credits include Employment Insurance premiums, Canada Pension Plan contributions, tuition, student loan interest, medical expenses, charitable donations and qualified moving expenses. Formulas to calculate the amount of tax credits available are set by the Department of Finance and administered by the Canada Revenue Agency (CRA). Individual tax returns for each year must be filed by April 30th of the following year. Once your tax return has been completed, the final total will indicate whether you have underpaid and owe taxes, or you have overpaid and will get a refund. If you owe money, interest and penalties will accrue if you pay after the April 30th deadline. You are entitled to challenge the total if you disagree with CRA. |
||
| Certificate Provided | No certificate is issued upon completion. | ||
| Additional Information | Our course works on most devices including laptops, desktops, tablets, iPads and most newer smartphones. Google Chrome or Mozilla Firefox are the recommended web browsers. Group Discounts are available for large volume purchases. | ||
| Additional Steps | Please ensure the information you fill at checkout is correct and in the correct capitalization. Enter your name as it appears on your Government Issued Photo Identification. This info will appear on your certificate as inputted by the learner. Certificate change requests are subject to additional fees. | ||
| Course Access Rights | Should an extension be requested a fee equal to the initial payment or a minimum of $24.98 will apply before any extension is issued. Corporate and educational group students must contact their supervisor for an extension. | ||
| Refunds | Refunds must be requested prior to student starting course. No refunds will be issued if you have started your course. To receive a refund, please forward your electronic receipt to our customer service department: info@alphalifetrainers.ca with the subject heading: Online Course Refund. State the reason for your request. Refund requests will not be accepted after the student has started the course, or if the course has expired. All Group purchase sales are considered final. | ||
Getting Started:
The purchase of a home is one of the biggest decisions and significant financial investments you will make, and understanding each step of the mortgage process is key to ensuring this investment is right for you.
There is no substitute for being prepared. Educate yourself and get the facts you need to make the right mortgage decision and increase your home buying confidence. Different consumers are at different stages in their lives. They have different mortgage needs and there are many mortgage products to choose from. The best result will occur when you work with a mortgage professional who can offer sound, professional advice and a mortgage solution that matches your needs and circumstances. Above all, you need to be comfortable with your mortgage choice.
The site simplifies the process by providing you with the resources you need to find the right mortgage solution and the right mortgage professional for you.
KEY QUESTIONS TO ASK BEFORE YOU BEGIN:
When connecting with a mortgage professional to help with your purchase, there are a number of key questions you must ask to ensure you are a) dealing with the right professional and b) they are transparent about their business and dealings to ensure they are committed to you and getting you the best deal. Being informed and getting more information always protects you as a homebuyer.
Here are some of the questions you should ask:
- What is your role in helping me buy a house?
- What products do you offer?
- Why are you recommending this particular mortgage?
- What is your relationship between you and the lender?
- How are you compensated?
- How long have you been in business?
- May I see some references?
- How long will it take to process my application?
- What documents do I need to provide?
CREDIT SCORE:
A credit score is a summary of your credit history and how consistently you pay your financial obligations. It includes credit account information, employment and personal financial information.
Having good credit history and a good credit score are very important when purchasing a home. A good credit score may help you borrow the money you require to purchase your home. A poor credit score may determine whether you have to pay a higher interest rate. Basically, your credit score indicates how likely you are to repay future debts and can speed up or slow down your mortgage approval process.
More than one credit report bureau keeps records on you. Equifax and TransUnion are the two principal credit bureaus in Canada. Use the links below to obtain additional information on what a credit history and credit score are, why it's important to check your credit report, how to obtain a copy of your credit report and how you can improve your credit score if necessary.
It is important to obtain a pre-approval or a pre-qualification for the amount of money you can borrow from a lender and avoid looking at homes that may be out of your price range. The pre-approval process usually guarantees a rate for a period of 90 days while a pre-qualification will not provide a rate guarantee . In some cases, a lender may ask for a guarantor to provide additional security for the lender. A Guarantor is a party who signs the mortgage documents along with the borrower, but who does not have any interest in the ownership of the property.
UNDERSTANDING THE ELEMENTS OF A MORTGAGE:
Few people can come up with the entire amount of money required to pay for the cost of a home and require a loan to finance the purchase their home. The lender will require the property as security in order for the borrower to obtain the loan. The security of land is referred to as a mortgage. A mortgage loan allows individuals to buy property without paying the full value all at once. The mortgagor is the person borrowing money, the mortgagee is the lender of the money.
Here are some elements to consider when getting a mortgage:
- When negotiating the amount of your mortgage loan, you should be aware that you will most likely be required to provide a down payment, which is the money you put towards the purchase price of your home. The amount of your mortgage loan is determined by the purchase price of the home less the amount of your down payment. As with all loans, a mortgage loan must be repaid by the borrower with interest. There are different types of repayment methods which make up the different kinds of mortgages available.
- Like all loans, regular payments made over time go towards paying down the mortgage. These payments are made up of two parts – one part goes towards paying the principal (the amount of money borrowed) and other part goes towards paying the interest (the fee charged for borrowing the money.)
- The more money you can put down, the less you will have to borrow, and the less interest you will have to pay over the length of the mortgage.
- If you have a down payment equivalent to 20% or more of the purchase price, you will have what is called a conventional mortgage.
- If your down payment is less than 20% of the purchase price, you will have what is called a high-ratio mortgage. A high-ratio mortgage must be insured to protect the lender. This insurance is called mortgage default insurance. It protects the lender in case the borrower isn’t able to repay the loan.
- Canada Guaranty, Canada Mortgage and Housing Corporation (CMHC) and Genworth Canada offer assistance to first-time home buyers who do not have a lot of disposable funds for a down payment. Ask your mortgage professional for more details.
How does a mortgage work?
Simply put, a mortgage is a loan to buy a home.
Principal vs. Interest: In the early years of a mortgage, a greater percentage of each payment goes towards interest charges and a smaller percentage covers the principal repayment. As the amount you owe decreases, more of each payment goes toward paying down the principal.
Building Equity: The more principal you pay down, the more equity you build up in your home. Basically, equity is the amount of your home that you own. If your home is worth $300,000 and your mortgage is for $250,000, that means you have $50,000 in equity.
What is amortization?
Amortization is how long it will take to pay your mortgage in full. Term refers to the length of a mortgage contract provided by a lender. The total length of a mortgage is usually made up of several terms. For example, a lender may offer a 5-year term though it may take 25 years to pay your mortgage completely.
Shorter Amortization:
-
Less time to pay off your mortgage
-
Less interest paid overall
-
Higher mortgage payments
Longer Amortization:
-
More time to pay off your mortgage
-
More interest paid overall
-
Lower mortgage payments
The length of the current mortgage agreement. A mortgage may be amortized over a long period (such as 30 years) with a shorter term (six months to five years or more). After the term expires, the balance of the principal owed on the mortgage can be repaid or a new mortgage agreement can be entered into at the current interest rates.
What does term mean?
These results are based on the above example as well as a number of assumptions. While care is taken in the preparation of this illustration, no warranty can be made as to its accuracy or applicability for any particular case.
What’s the difference between fixed and variable interest rates?
Fixed Rate mortgage: Your interest rate and mortgage payments remain the same throughout the term. This means you’ll know exactly how much you’ll still owe at the end of every term.
Variable Rate Mortgage: Your interest rate changes with BMO’s prime rate while your mortgage payments remain the same throughout the term. This means that if interest rates fall, more of your mortgage payment is applied to the principal. If interest rates increase, more of your payment will go towards interest.
It’s important to note that interest rate fluctuations may also affect your amortization period (number of years required to pay off the mortgage), and if a rate increase results in a longer amortization period, your payments may have to increase.
What’s the difference between open or closed mortgages?
Open Mortgage: You can repay all or part of your mortgage at any time without a prepayment charge. This means you can pay off your mortgage faster, but your interest rates may be higher than on a closed mortgage.
Closed mortgage: You have fixed payments for a significant period of time, but your prepayment options are limited. This means that your interest rate is usually lower than on an open mortgage. If you wish to make a lump sum, you may be limited as to how much you can prepay without a prepayment charge being applied.
How do I set a payment schedule?
Another important decision is setting your mortgage payment frequency. Traditionally, mortgage payments are made every month. But there can be significant benefits to paying more frequently, especially if you choose an accelerated bi-weekly or weekly option.
With more frequent and accelerated payments, you pay a little more each month, but you’ll benefit by paying down your mortgage faster and saving interest costs over the long term.
What is the proper posture for a child?
We’re all familiar with the phrase “Sit up straight or you’ll get back pain”, usually followed by a pat on the back to straighten you up. Good posture in children is very important to ensure they grow up healthy and happy. With the new generation of kids spending a lot of more time hunched over, looking at their screens, the concept of good posture becomes critical to their well-being. Add to this the sedentary nature of “Virtual School” and you can see why it has become a matter of concern.
What is Posture?
Let’s start with the basics – What is Posture? Posture is the way in which you carry your body, as a result of the co-ordinated actions performed by various muscle groups to maintain stability. The main intent of good posture is to reduce the strain on the muscles holding your body up. Good posture focuses primarily on alignment of the spine – whether the spine is neutral and aligned correctly. The alignment of the neck, the shoulders, the hips and the feet are also key to good posture.
Adverse effects of bad posture
Bad posture can have some pretty adverse effects on the health of a growing child:
- Chronic neck and back pain are well-known side-effects of poor posture. This can also affect their ability to concentrate, balance and general confidence levels.
- Slouching constantly can also puts pressure on the child’s internal organs and cause digestive issues.
- Since posture is a matter of “habit” and will be carried into adulthood, it is important to correct it sooner, rather than later. When continued into adulthood, bad posture can lead to more serious problems like scoliosis, or abnormal bone growth and has been shown to have a link with varicose veins and elevated risk of heart disease.
The right posture for a child

- The proper posture for a child, while standing, is to ensure that the weight is distributed equally on both feet which are placed hip-width apart.
- Standing in the “Soldier Position” with an arched back, stiff neck and shoulders and head pulled back, will also have the same detrimental effects as “Slouching”.
- The spine needs to be neutral and relaxed, with its natural curvature.
- Ideally, they should stand tall, with their neck straight. Imagine that the head is a balloon filled with helium floating upwards, and the string of the balloon is the neck – This is what we’re going for.
- While sitting in a chair, the child’s feet should be able to reach the floor or the chair should have a cross-support at a comfortable level for them to rest their feet. The ergonomics of the chair, especially one that the child sits in for extended periods of time, is very important for this.
Techniques to build postural awareness in children:
The biggest hurdle parents are confronted with when teaching their children about good posture is that children are often not conscious of the way in which they are holding their bodies. You can try the following techniques/activities to build postural awareness in your child:
- Try showing them pictures of different postures and play a game of spot the difference or imitate the posture. This would give them a clearer idea of what good posture feels
- Try out a body-mapping activity with your child – This is where you trace all the different movements that go into performing an action, like picking up a pen from the floor. The child’s instinct might be to bend at the spine and pick up the pen, but the more efficient way is to bend the knees.
- Practice sitting on stools that don’t have back support for short periods at a time (maybe 5 mins) and take stretching breaks in between. This will help strengthen the child’s back muscles and make maintaining good posture easier.
- During screen use, prop up the computer at eye level so the child doesn’t strain their neck or slouch.
Trying some of these techniques will make your child more aware of their body and can help create a habit of good posture.
If you’re concerned that your child’s posture is abnormal, it’s a good idea to check with a paediatrician.
POSTURE EXERCISES FOR SENIORS:
THE COMPLICATIONS OF HYPERKYPHOSIS POSTURE
The known complications of abnormally accentuated thoracic curvature, or hyperkyphosis posture, includes poor respiratory function, decreased balance and a loss of ones ability to perform activities of daily living (ADL) to name a few.
In a 2009 study researchers found thoracic hyperkyphosis was a predictor of an increased risk of death in elderly women, leading them to conclude, “hyperkyphosis should be recognized as a geriatric syndrome.” Additionally, an earlier study by Huang and colleagues found that modest hyperkyphosis increased the risk of vertebral fracture over the next 4 years.
In the elderly, falls can have serious consequences resulting in a loss of one’s independence. Kado et al. showed that hyperkyphotic posture may identify a risk factor in men for injurious falls. More specifically, the authors go on to state that “the simple clinical observation of being unable to lie flat could potentially aid in identifying older men at high risk for future injurious falls, so that targeted interventions can be made.”
One concomitant factor regularly identified with thoracic hyperkyphosis is a forward head posture, which is directly related to respiration. Szczygiel and colleagues reported that a change in head posture decreased respiratory movements most notably of the lower chest requiring increased respiratory movement of the upper chest and accessory neck muscles.
The loss of ADL function is also of concern as many countries are experiencing a declining birth rate resulting in a disproportionate ratio of young people to care for an aging population. This was most notably pointed out in a study by researchers in Japan who monitored the ADL function in people age 65-94 over four and a half years. They concluded that attention needs to be paid to the inclination of spinal posture to identify elderly people at high risk for becoming dependent on their ADL needs.
In 1916 the Journal of the Osteopathic Association defined normal posture as “an equilibrium in which there is no strain on the ligaments and a minimum expenditure of muscular force over and above the energy called muscle tone, a nice balance in which the centre of gravity passes in the correct relation to the bony structures.”
Since then, there have been various definitions of normal posture all concluding without proper sagittal alignment the spine and body will undergo compensatory changes both physically and mechanically.
WEAK BACK AND POOR POSTURE:
 There are several studies showing a relationship between hyperkyphosis and weak back extensor strength. This provides a great opportunity to work with and help this demographic improve their strength, and ultimately their quality of life. Prior to initiating an exercise program, it is important to have your client properly evaluated by a medical professional to rule out any underlying conditions including Scheurmann’s disease or other spinal pathologies. (9) Once cleared by their health care provider a simple assessment is necessary for a variety of reasons.
- Documented assessments are a great way to create a sense of urgency that is sometimes needed to get the client engaged enough to undertake necessary care. Visuals that show them their current state make it easy to illustrate associated risks and explain how you will help them.
- Regular follow up assessments will help clients to understand their progress. Seeing an improvement in posture or strength can help them ‘celebrate’ small wins and further commit to their program.
- Re-assessing is a great chance of re-connecting and will allow you to reflect on their progress together and discuss future goals. Plus, making the client aware of upcoming assessments can create stronger accountability and program adherence.
- Find assessments that work for you (and your client), are relatively easy to execute and be consistent when using them
Utilizing the NASM guidelines for assessing posture, note your upper and lower cross findings (11). A picture of your clients’ posture can often be more powerful than just providing an explanation. This can be done easily with your smart phone or with more advanced digital assessment app such as PostureScreen Mobile. However, it is always prudent to get the clients consent prior to any digital assessment.
Once you have the baseline assessment established, a good starting point is exercises focusing on thoracic extension, shoulder flexion, scapular strengthening and hip extension. Katzman and colleagues showed these types of exercises performed daily for 12 weeks produced an 11% improvement in kyphotic posture of women 65 years and older.
Baking is a science that relies on the understanding of the basic fundamentals of the baking process. Once you understand how each action you take affects the finished product, you will be able to replicate recipes with greater ease.
A degree in chemistry or physics isn’t needed to be a good baker but a good understanding of the everyday science of the kitchen will make you well-rounded when it comes to baking.
It is important that you comprehend the scientific principles behind each action that takes place when you mix flour, fat, and water together to create a baked good.
The importance of accuracy
Almost all baked goods are made of the same ingredients: flour, water, salt, fat, and leavening agents. Sometimes the only difference between two products is the method used to assemble the ingredients. Other times the difference is the ratio of ingredients used in a recipe. Small changes to the method and ratio can have large effects on the quality of a baked good. This is why it is so important to follow recipes exactly as written and measure the ingredients properly.
Measuring ingredients:
Precise, accurate measurements of ingredients is extremely important. If you want to reproduce the exact same result as the recipe author, it is crucial that you measure the ingredients with accuracy. Most recipes include either Imperial or metric measurements. Some recipe authors include both.
If both measurements are listed in a recipe, do not mix and match which measurements you use. Choose one and stick with it. For example, do not weight the flour then measure other ingredients in cups or ounces. This will cause there to be inaccuracies in measurements and will affect the final product in a negative way.
Measuring with cups
To measure dry ingredients use stainless steel or plastic measuring cups.
For flour, fluff the flour with a fork and spoon it lightly into the measuring cup. Let it mound, don’t shake the cup or pack down the flour. Use a straight edge such as a knife to level the top of the measuring cup.
To measure liquid ingredients, use a liquid measuring cup with a pouring lip. Set the cup on a level surface and read the measurements at eye level.
To measure brown sugar, use a measuring cup that holds the exact amount called for in the recipe. Pack the brown sugar into the dry measuring cup and then level it off with a straight edge.
To measure syrupy ingredients like honey, molasses, or corn syrup, first, coat the measuring spoon or cup with a light coating of cooking spray. This allows the ingredient to slip out easily.
Baker’s percentages
Many recipes rely on formulas. This is especially true for bread. These formulas are referred to as baker’s percentages. Each ingredient is expressed as the amount of an ingredient compared to the total amount of flour. Flour is always used as the basis for baker’s percentages because it is usually the most predominant ingredient.
The total amount of flour is considered 100% so all combined ingredients add up to more than 100%. This can get confusing for some since baker’s percentages are different than percentages taught in math. Think of it like this, baker’s percentages are like ratios. Each ingredient is a ratio to the amount of flour which is always 100%.
Let’s look at the chart below:
| Ingredient | Weight | Baker’s Percentage |
| Flour | 500g | 100% |
| Water | 300g | 60% |
| Yeast | 10g | 2% |
| Salt | 5g | 1% |
| Total | 815g | 163% |
The flour is 100%. Then each ingredient is expressed relative to the flour. Personally, I only use baker’s percentage with developing yeast bread with a certain hydration point.
You can use baker’s percentages for things like a baked custard. For this, each ingredient would be expressed relative to the dairy ingredients (milk and cream) because those make up the bulk of the recipe.
The importance of ingredient temperature:
You can choose the highest quality ingredients, measure them accurately, and mix them properly, but if the temperatures are not controlled, there is a chance for failure. Many ingredients, mainly fats, change properties with temperature.
Not only is it important to temper eggs or yolks before adding them to custard, but it’s also important to bring cold ingredients to room temperature when making batters and doughs. When all the ingredients are at the same temperature, they emulsify easily. This results in a smooth, uniform batter that will bake into a perfect product.
Unless a recipe specifically calls for cold ingredients, it’s a good rule of thumb to set these ingredients out on the countertop 30 minutes prior to making the recipe.
Mixing methods
After properly measuring ingredients, the next step is mixing. Ingredients must be mixed in a specific order to achieve the desired results. The mixing technique you use will greatly affect the product’s volume, appearance, and texture.
Mixing does the following:
- Evenly distributes the ingredients.
- Breaks down the fat and liquids causing them to emulsify.
- Activates the proteins in flour, developing gluten and structure.
- Incorporates air to help give the baked good rise and lighten the texture.
There are 9 different mixing methods and each one serves its own purpose. Blending, folding, sifting, and stirring ensures the ingredients are properly combined. Cutting also combines ingredients but it ensures the final product bakes up flaky. Beating, creaming, kneading, and whipping incorporate air into the batter. The air pockets give the baked good its final texture after baking.
Fats do not blend with water. But stirring, beating, creaming, blending, and kneading break up fats into particles which allows them to blend with other liquids into a homogenous mixture.
Don’t over mix batters. Allow batters to rest when called to do so. Handle doughs as little as possible.
Pay attention to what a recipe is asking you to do. The method in which the ingredients are combined can make or break the final product.
Heat transfer:
Applying heat to a fully mixed batter or dough will transform it into a delicious finished product. Heat is a type of energy and when a substance is heated, it will absorb energy. This causes the molecules to vibrate rapidly and expand. As they expand they bounce off one another causing the heat to transfer.
It’s important to make sure you leave room between pans in the oven for air to circulate freely. This helps to maintain an even oven temperature and promotes even cooking. It’s also important that you don’t open and close the oven door during baking. Opening the door allows heat to escape causing the temperature to drop.
The baking process does not stop once a product is removed from the oven. There is residual heat contained in the hot pan and will continue to bake as the product cools. This is why most cookie recipes state the cookies will look undercooked when you remove them from the oven. But as they cool, the cookies will finish baking and become crisp.
It’s super important to pay attention during the last few minutes of baking and remove the baked good at the right moment.
Chemical leavening agents:
Baking powder and baking soda are two different ingredients.
They serve the same purpose but they do not react the same way.
Baking soda is plain sodium bicarbonate. It works by neutralizing an acidic component by creating bubbles that cause leavening. Some common acids in baking include buttermilk, brown sugar, yogurt, lemon juice, vinegar, and chocolate.
Baking powder is sodium bicarbonate mixed with an acid, usually cream of tartar. Baking powder is used in baked goods that do not already contain an acid. It works the same way baking soda does. Generally, you can substitute baking powder for baking soda but not the other way around.
However, if you find yourself in a pinch and need a substitution for baking powder you can mix ½ tsp cream of tartar plus ¼ tsp baking soda per 1 tsp of baking powder called for in the recipe. When using baking powder in place of baking soda, you will need much more since baking soda is significantly more effective.
Check to see if your baking powder is still effective by adding 1 tsp to 1 cup of hot water. If it bubbles then it is still good. If not, then it is time to throw it out.
What business are you trying to build?
Before you start spending money to set up your company, it’s essential to ensure your business idea has the potential to be successful. It’s a competitive world out there. Taking some time to research your idea will pay huge dividends down the road.
- How will your company stand out from the crowd?
- Who are your target customers?
- How much money will you need and where will you get it?
Start with market research:
To find a profitable niche, you should do some initial market research to identify your target customers and understand their needs and desires. You should also get familiar with the competition and pinpoint market gaps your company can fill.
Your goal is to find the right product-market fit—the sweet spot where you are attracting customers and turning them into loyal advocates for your company. Statistics Canada’s Small Business Hub offers research resources to help existing and aspiring entrepreneurs plan and run their enterprises.
Think about financing and look for mentors:
This is also the time to start thinking about where you’re going to find the money to start and run your business. Here, there are more possibilities than ever before, but you have to make sure the one you pick fits your ambitions. There is more information on financing your company lower down in this article.
To help with these tasks and others on the road to launching your company, it’s a good idea to find a mentor with deep business experience. If you are between 18 and 39, Futurpreneur Canada can assist you in finding a mentor.
Choose a business structure:
The next step is to select a structure for your new company. In Canada, there are three common types of business structures, each with their own pros and cons.
- Sole proprietorship—A sole proprietorship is quite informal and easily created, which is why it’s the most common structure chosen by new entrepreneurs. In this structure, the business and the operator are the same in the eyes of law and tax authorities. The downside is that the owner is personally liable for all functions and debts of the business.
- Partnership— A partnership is similar to a sole proprietorship, but instead of one proprietor there are two or more. As with a sole proprietorship, there is no legal structure, as such, for a partnership. However, partners usually have some type of contractual agreement among themselves that governs the sharing of revenues, expenses and tasks.
- Corporation—When you incorporate a business you create ownership shares, which produce a taxation and legal distance between the company and its shareholders. This has tax advantages for the owners; provides some liability protection from the corporation’s debts; and offers some measure of protection for a company’s name. The downside is that setting up a corporation involves initial and ongoing costs for legal and accounting fees.
How to register as a corporation:
To register as a corporation, you will need to take the following steps:
- Incorporate your business through federal incorporation or provincial/territorial incorporation.
- Get a federal business number and corporation income tax account from the Canada Revenue Agency (CRA).
- Register as an extra-provincial or extra-territorial corporation in all other Canadian jurisdictions where you plan to do business.
Pros and cons of business structures:
Here’s a summary of the pros and cons of the three most common business structures.
| Sole proprietorship | Partnership | Corporation | |
| Legal status | Does not exist as a separate legal entity.
Proprietorship = ownership |
Does not exist as a separate legal entity.
Partnership = partners as owners |
Corporation is treated as a separate legal entity from its owners.
Corporation = shareholder ownership |
| Control | Owner has total control. | Partners’ agreement determines control between partners. | Directors and shareholders. |
| Profits | Profits are paid to the owner. | To partners according to a partnership agreement. | Earned by the corporation. Dividends may be paid to shareholders and/or retained in the corporation. |
| Debts | The owner is responsible (unlimited liability). | Partners are individually and collectively responsible. | Paid by corporation. |
| Taxation | The owner is taxed as an individual on the income of the business as if he or she was employed. | Partners are taxed individually according to their share of the income. | The corporation pays corporate taxes separately from taxes paid by directors and shareholders. |
| Assets | Business assets are wholly owned by the proprietor. | Partners jointly own business assets and/or ownership is governed by partnership agreement. | Business assets are owned by the corporation. There is no specific claim on the corporate assets by shareholders. |
Do start-ups have to pay taxes in Canada?
If you provide taxable property and services in Canada and your total taxable revenues exceed $30,000 in any single calendar quarter or in four consecutive calendar quarters, you will have to register for the GST/HST. More details are available on the Canada Revenue Agency’s website.
You may also need to collect income tax for the profits you earn. You will need to complete a tax return at the end of your first year of activity to determine how much tax you owe, if at all. Income tax laws vary by province and territory and at the federal level. It is probably best to hire a professional accountant to help you complete your annual tax return.
The Canada Revenue Agency offers a free liaison officer service to owners of small businesses and self-employed individuals to help them understand their business tax obligations.
Choose a business name:
Selecting a name for your business is not a task to be taken lightly. In fact, it may prove more difficult than you expect. Your name must be accurate, catchy and, most importantly, available. Your name will often create your company’s first impression on customers, so choose it with care.
Ask yourself the following questions.
- Does the name reflect my business and what I sell?
- Can it be easily remembered?
- Is it unique and distinctive?
By law, the name can't be the same as, or very similar, to an existing corporate name or trademark. So, it’s important to do a careful search of existing business names before selecting one. Most companies need to register their business name with the government. However, you generally do not need to register a sole proprietorship if it operates under your own legal name and personal bank account.
You may also need permits or licences to operate your business.
Do think your ideas or inventions might need protection from being copied? Learn about intellectual property protection. Check out the website of the Canadian Intellectual Property Office (CIPO) for more information.
Put together a business plan:
With the steps you’re already taken, you’re well on your way to setting up a business. Now, it’s time to write a business plan. This is the document where you describe your vision for the business and outline how you will accomplish it in detail.
Your business plan should include the following elements.
- Executive summary—An overview of your business plan.
- Business overview or company profile—Your products and services, the market you will be serving and trends in your industry.
- Sales and marketing plan—Your target customers and how you intend to market and sell to them. This section also provides information on pricing and distribution.
- Operations plan—Your location, equipment and machinery, production planning, customer interactions, research and development and any other important information about your operations.
- Human resources plan—The number and characteristics of employees and what policies you will have in place for them. Short-term and long-term plans for recruitment, training and retention of workers. The human resources plan is sometimes included in the operations plan.
- Action plan—A timetable for achieving specific milestones in establishing and running your business.
- Financial plan—Key financial information, including projected revenues, expenses, costs of goods, cash flow and a budget for two years, but mostly focused on the first 12 months.
Bringing this information together in one document will not only give you a roadmap for building your business, but also provide investors and lenders with the information they need to decide whether to finance your company.
BDC's article How to write an effective business plan provides more information on the key elements of a plan. You can also read our article on Common mistakes to avoid when building your business plan.
Prepare an elevator pitch:
Apart from your business plan, you should also prepare an elevator pitch. This is a short and compelling description of your business that can be delivered in 60 to 90 seconds.
The idea is that not everyone will have the time or the interest to read your business plan. That’s why you need to be able to pitch potential investors, lenders, partners and customers on your business in the time it takes for an elevator to go up a building.
Finance your new business:
While many entrepreneurs start out by bootstrapping their businesses—meaning they use only their own money to finance their company—sooner or later most growing businesses will want to find outside financing.
Getting financing is a huge milestone in the life of a new company. There are two broad categories of financing—debt and equity.
Debt financing means you are borrowing money from someone that will have to be repaid. This type of financing includes loans from financial institutions and personal loans. You’ll pay interest on the money you borrow and repay it in regular, usually monthly, instalments.
Equity financing refers to investments made in return for a share of the ownership of your business. While, it doesn’t have to be repaid, an equity investor will likely want to be involved in decision-making. Equity financing includes money from angel investors and venture capitalists.
Main sources of financing for start-ups:
Personal investment:
When starting a business, your first investor should be yourself. Investing your own money, and/or putting up your assets as collateral, shows investors and bankers you have a long-term commitment to your business and are ready to share risk with them.
Love money:
This is money loaned to you by a spouse, parents, family or friends. Investors and bankers considers this to be patient capital, meaning it’s money that can be repaid later as your business grows and become more profitable. When borrowing love money, you should remember that a business relationship with family or friends should never be taken lightly.
Business loans:
Loans from banks and other financial institutions are the most common source of funding for small and medium-sized businesses.
For new businesses seeking relatively small loans, the best route is often to get an online loan. Many lenders now use algorithms and artificial intelligence to assess risk. They take such information as your personal credit history, income, home ownership and current debt and compare it to the credit profiles of thousands of other borrowers to make a decision on granting you a loan.
Specialized organizations such as Futurpreneur can also be a good place to get your first business loan.
Credit card and lines of credit:
Many new entrepreneurs rely on credit cards and lines of credit to fund their businesses. While these are easy sources of cash and their use is often encouraged by financial institutions, you should be careful with them. They often carry high, variable interest rates that can drain your company’s cash flow. Term loans are often a better option because they carry lower rates and your payments are fixed.
Angel investors:
Angel investors are generally wealthy individuals or retired company executives who invest directly in start-ups. They are often leaders in their field who can also offer their experience, network of contacts and technical and/or management knowledge to early-stage companies. You can find angel investors through such organizations as the National Angel Capital Organization.
Venture capital:
Venture capitalists are looking for technology-driven businesses and companies with high-growth potential in sectors such as information technology, telecommunications and biotechnology. Venture capitalists take an equity position in the company to help it carry out a promising but higher risk project and expect a high return on their investment.
Grants and subsidies:
Many types of grants, subsidies and other resources can help in starting to build up your business. While these funds don’t need to be repaid, they are limited in nature and can be difficult to obtain.
Try Canada’s Business Benefits Finder to see what kind of grants could be right for you.
Business incubators:
While business incubators or accelerators are not strictly a source of funding, they can be a great place to network and access resources when starting a business. Most incubators and accelerators are focused on the high-tech sector. However, there are also local economic development incubators that assist start-ups in more traditional sectors.
Pros and cons of each source of financing for start-ups:
| Pro | Con | |
| Personal investment | Shows you are committed to your busines | Repayment is dependent on your business’s success. |
| Love money | Is based on your personal relationship with the lender and usually comes with few conditions. | Often not enough money to fully finance your business. |
| Bank loan | Comes with relatively low interest rates. | Must be repaid, usually in monthly instalments. |
| Credit cards | Easy source of cash that can help you build your credit score. | High interest rates can quickly drain your cash flow. |
| Angels | Often share knowledge and experience with you. | May require giving up ownership in your business. |
| Venture capital | Can be more tolerant of risk. | Expects a high return on investment. |
| Grant | Does not have to be repaid. | Hard to obtain. |
Choose a commercial space:
When it’s time to set up your business in a commercial space, you will have to make some important decisions, including whether to buy or rent and how much you can afford to pay. For some types of businesses, such as retailers, location will obviously be a key consideration. For others, like tech start-ups, it will be less important. (More companies are foregoing a commercial space altogether in favour of working virtually.)
Other important factors in your choice of premises include access to the property for employees and suppliers and whether you will need to make improvements to the property to run your business.
If you are renting space, you will probably have to sign a commercial lease. It’s a good idea to consult your lawyer to understand all the clauses in the lease before signing it. Whether renting or buying your premises, you will need insurance to protect your assets.
Hire employees:
As your company grows, you will likely need to hire employees. This could be one of your most challenging tasks as an entrepreneur, especially at a time of labour shortages in many parts of the country.
How to hire your first employee:
It’s important resist the temptation to rush the hiring process because you have an immediate need to fill a position. Taking the time to do a thorough job can save you a lot of headaches and wasted time if you hire the wrong person. Here are some tips on hiring employees.
- Write clear job descriptions for the positions you are hiring for. Make them as detailed as possible to attract the right applicants.
- Post the position on job boards, social media and internally.
- Select the best applicants to call in for an interview.
- Referring to your job description, make a checklist of required skills, personal qualities and education so you can grade the applicants.
- Prepare interview questions that will delve into an applicant’s experience and background. You want as clear a picture as possible of how they would fit into your organization, focusing on what the person would be doing and their ability to fulfill that role.
- Avoid personal questions and questions that are discriminatory (i.e., those that touch on age, marital/family status, race, religion, sexual orientation, etc.)
- Consider getting candidates to do a sample piece of work that reflects what they would be doing at your company.
- Using your checklist, ask yourself how well each candidate meets your requirements and rank them.
- Once you’ve chosen a candidate, ask for references and make sure to follow up on them.
- Once you have checked references and made a final selection, it’s time to draw up a letter of offer. The letter should cover such items as compensation, working hours, vacation and benefits.
- Once the candidate has been hired, you’ll need to make the proper payroll deductions for the Canada Pension Plan, Employment Insurance as well as federal, provincial or territorial income taxes.
Grow your business:
Getting your business up and running is only the start of your business journey. Your first year will be one of your most challenging. It’s when many businesses fail.
You will have to keep your eye not only on your day-to-day operations but also planning for your company’s future growth. The difference between the two is often described as working in the business versus working on business.
One skill that can mean the difference between success and failure is learning how to manage your cash flow. Using a cash flow planner will help you forecast inflows and outflows and avoid cash crunches.
Equally important as managing your cash is learning how to manage yourself so that you’re making the best use of your time.
First Aid & CPR Courses
| Course Length | Standard First Aid & CPR: 13–14 hours teaching time. Flexible scheduling options.
Blended Standard First Aid: 8 hours online learning, 5.5 - 7.5 hours teaching time |
|---|---|
| Percentage Required To Pass | 75% |
| Audio/Visual Format | Fully narrated interactive presentation, with audio, video, photos and end of module quizzing. |
| Certificate Name & Certificate Validity | Standard First Aid & CPR Level A or C.
Valid in all Canadian Provinces & Territories for 3 Years from Date of Issue. |
| Topics Covered |
|
| Certificate Provided | You will receive your printable digital certificate & wallet card within 24 hours of successful exam completion, via email. |
| Training Approved By | Ontario, Manitoba, Nova Scotia, Prince Edward Island, Saskatchewan, New Brunswick, Yukon, Nunavut, Newfoundland and Labrador, Northwest Territories. |
| Additional Information | Our course works on most devices including laptops, desktops, tablets, iPads and most newer smartphones. Google Chrome or Mozilla Firefox are the recommended web browsers. Group Discounts are available for large volume purchases. |
| Additional Steps | Please ensure the information you fill at checkout is correct and in the correct capitalization. Enter your name as it appears on your Government Issued Photo Identification. This info will appear on your certificate as inputted by the learner. Certificate change requests are subject to additional fees. |
| Course Length | Standard First Aid & CPR A: 6.5 hours in-class OR 3.5 hours in-class + 4 hours online learning ( Blended)
CPR C: 7.5 hours in-class OR 4.5 hours in-class + 4 hours online learning(Blended). Flexible scheduling options. |
|---|---|
| Percentage Required To Pass | 75% |
| Audio/Visual Format | Fully narrated interactive presentation, with audio, video, photos and end of module quizzing. |
| Certificate Name & Certificate Validity | Emergency First Aid & CPR Level A or C.
Valid in all Canadian Provinces & Territories for 3 Years from Date of Issue. |
| Topics Covered |
|
| Certificate Provided | You will receive your printable digital certificate & wallet card within 24 hours of successful exam completion, via email. |
| Training Approved By | Ontario, Manitoba, Nova Scotia, Prince Edward Island, Saskatchewan, New Brunswick, Yukon, Nunavut, Newfoundland and Labrador, Northwest Territories. |
| Additional Information | Our course works on most devices including laptops, desktops, tablets, iPads and most newer smartphones. Google Chrome or Mozilla Firefox are the recommended web browsers. Group Discounts are available for large volume purchases. |
| Additional Steps | Please ensure the information you fill at checkout is correct and in the correct capitalization. Enter your name as it appears on your Government Issued Photo Identification. This info will appear on your certificate as inputted by the learner. Certificate change requests are subject to additional fees. |
| Course Length | Level A: 4 hours, Level C: 5 hours
Blended CPR A: 3 hours online learning, 2 hours teaching time; Blended CPR C: 3 hours online learning, 3 hours teaching time |
|---|---|
| Percentage Required To Pass | 75% |
| Audio/Visual Format | Fully narrated interactive presentation, with audio, video, photos and end of module quizzing. |
| Certificate Name & Certificate Validity | CPR & AED. Level A or C.
Valid in all Canadian Provinces & Territories for 3 Years from Date of Issue. |
| Topics Covered |
|
| Certificate Provided | You will receive your printable digital certificate & wallet card within 24 hours of successful exam completion, via email. |
| Training Approved By | Ontario, Manitoba, Nova Scotia, Prince Edward Island, Saskatchewan, New Brunswick, Yukon, Nunavut, Newfoundland and Labrador, Northwest Territories. |
| Additional Information | Our course works on most devices including laptops, desktops, tablets, iPads and most newer smartphones. Google Chrome or Mozilla Firefox are the recommended web browsers. Group Discounts are available for large volume purchases. |
| Additional Steps | Please ensure the information you fill at checkout is correct and in the correct capitalization. Enter your name as it appears on your Government Issued Photo Identification. This info will appear on your certificate as inputted by the learner. Certificate change requests are subject to additional fees. |
| Course Length | Learn lifesaving first aid skills in only 1-2 hours |
|---|---|
| Percentage Required To Pass | 75% |
| Audio/Visual Format | Fully narrated interactive presentation, with audio, video, photos and end of module quizzing. |
| Certificate Name & Certificate Validity | First Aid Basics Workshop.
Valid in all Canadian Provinces & Territories for 3 Years from Date of Issue. |
| Topics Covered |
|
| Certificate Provided | You will receive your printable digital certificate & wallet card within 24 hours of successful exam completion, via email. |
| Training Approved By | Ontario, Manitoba, Nova Scotia, Prince Edward Island, Saskatchewan, New Brunswick, Yukon, Nunavut, Newfoundland and Labrador, Northwest Territories. |
| Additional Information | Our course works on most devices including laptops, desktops, tablets, iPads and most newer smartphones. Google Chrome or Mozilla Firefox are the recommended web browsers. Group Discounts are available for large volume purchases. |
| Additional Steps | Please ensure the information you fill at checkout is correct and in the correct capitalization. Enter your name as it appears on your Government Issued Photo Identification. This info will appear on your certificate as inputted by the learner. Certificate change requests are subject to additional fees. |
| Course Length |
|
|---|---|
| Percentage Required To Pass | 75% |
| Audio/Visual Format | Fully narrated interactive presentation, with audio, video, photos and end of module quizzing. |
| Certificate Name & Certificate Validity | Basic Life Support + Oxygen Administration + Airway Management.
Valid in all Canadian Provinces & Territories for 1 years & 3 yrs. subsequently from Date of Issue. |
| Topics Covered |
Airway Management is designed to provide participants with the knowledge and skills to create a patent airway, the interventions to maintain it, and the equipment available to carry out these skills. Participants will gain the knowledge and skills required to provide the appropriate interventions, including measuring and inserting the applicable airway adjunct based on the patient’s condition. 3 year certification Oxygen Therapy is designed to provide participants with the knowledge and skills to correctly identify when it is necessary to administer supplemental oxygen. Participants will learn how to properly and safely handle and assemble the equipment and how to correctly deliver supplemental oxygen through the appropriate delivery device. 3 year certification. |
| Certificate Provided | You will receive your printable digital certificate & wallet card within 24 hours of successful exam completion, via email. |
| Training Approved By | Ontario, Manitoba, Nova Scotia, Prince Edward Island, Saskatchewan, New Brunswick, Yukon, Nunavut, Newfoundland and Labrador, Northwest Territories. |
| Additional Information | Our course works on most devices including laptops, desktops, tablets, iPads and most newer smartphones. Google Chrome or Mozilla Firefox are the recommended web browsers. Group Discounts are available for large volume purchases. |
| Additional Steps | Please ensure the information you fill at checkout is correct and in the correct capitalization. Enter your name as it appears on your Government Issued Photo Identification. This info will appear on your certificate as inputted by the learner. Certificate change requests are subject to additional fees. |
| Course Length | 16 hours in class . Flexible scheduling options. |
|---|---|
| Percentage Required To Pass | 75% |
| Audio/Visual Format | Fully narrated interactive presentation, with audio, video, photos and end of module quizzing. |
| Certificate Name & Certificate Validity | Standard Child First Aid & CPR Level A or C.
Valid in all Canadian Provinces & Territories for 3 Years from Date of Issue. |
| Topics Covered |
|
| Certificate Provided | You will receive your printable digital certificate & wallet card within 24 hours of successful exam completion, via email. |
| Training Approved By | Ontario, Manitoba, Nova Scotia, Prince Edward Island, Saskatchewan, New Brunswick, Yukon, Nunavut, Newfoundland and Labrador, Northwest Territories. |
| Additional Information | Our course works on most devices including laptops, desktops, tablets, iPads and most newer smartphones. Google Chrome or Mozilla Firefox are the recommended web browsers. Group Discounts are available for large volume purchases. |
| Additional Steps | Please ensure the information you fill at checkout is correct and in the correct capitalization. Enter your name as it appears on your Government Issued Photo Identification. This info will appear on your certificate as inputted by the learner. Certificate change requests are subject to additional fees. |
| Course Length | 8 hours. Flexible scheduling options. |
|---|---|
| Percentage Required To Pass | 75% |
| Audio/Visual Format | Fully narrated interactive presentation, with audio, video, photos and end of module quizzing. |
| Certificate Name & Certificate Validity | Emergency Child First Aid & CPR Level A or C.
Valid in all Canadian Provinces & Territories for 3 Years from Date of Issue. |
| Topics Covered |
|
| Certificate Provided | You will receive your printable digital certificate & wallet card within 24 hours of successful exam completion, via email. |
| Training Approved By | Ontario, Manitoba, Nova Scotia, Prince Edward Island, Saskatchewan, New Brunswick, Yukon, Nunavut, Newfoundland and Labrador, Northwest Territories. |
| Additional Information | Our course works on most devices including laptops, desktops, tablets, iPads and most newer smartphones. Google Chrome or Mozilla Firefox are the recommended web browsers. Group Discounts are available for large volume purchases. |
| Additional Steps | Please ensure the information you fill at checkout is correct and in the correct capitalization. Enter your name as it appears on your Government Issued Photo Identification. This info will appear on your certificate as inputted by the learner. Certificate change requests are subject to additional fees. |
Healthcare Related Courses
- Must have an education background in medical/health care studies
- Proof of certificates/degrees/diplomas
- Letter from current employer (medical industry)
- and only if currently employed
This general workshop will be of interest to laboratory assistants, phlebotomists, nurses and other health care proffesionals involved in blood specimen collection. Students will develop skills in performing phlebotomy procedures in various healthcare settings.
The continuing education programs are designed to improve or refresh the skills of current health care professionals. Payment to be made in full to reserve your seat and it is non-refundable (some conditions apply)
REGISTER »
HIGHLIGHTED CLINICAL SKILLS:
![]() Fundamentals in blood collection
Fundamentals in blood collection
![]() The paper application of equipment required to perform venipuncture
The paper application of equipment required to perform venipuncture
![]() Problems that may occur during the venipuncture procedure
Problems that may occur during the venipuncture procedure
![]() Correct transport and specimen transport for laboratory testing
Correct transport and specimen transport for laboratory testing
![]() Importance of interpersonal skills
Importance of interpersonal skills
![]() Proper use of equipment
Proper use of equipment
![]() Medical and legal policies and regulations
Medical and legal policies and regulations
![]() Current safety standards
Current safety standards
![]() How to solve common problems
How to solve common problems
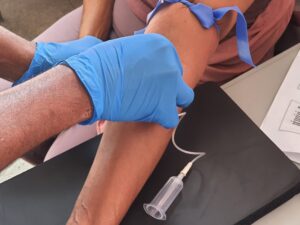
This course addresses the fundamental concepts related to caring for clients receiving Intravenous (IV) therapy. Course content will include all IV access lines (central and peripheral sites), IV medication administration and drug interactions, review of necessary equipment, dressing protocols, IV initiation using simulation equipment, client assessment, and appropriate nursing care.
This course includes classroom instruction as well as hands on experience within a simulation lab. The course is suitable for 3rd year last semester Collaborative Nursing Students, 2nd year Practical Nursing Students, or RNs and RPNs who wish to refresh their skills.
Course Overview
-
Detailed discussion of Intravenous system, IV therapy, Venipuncture procedure and equipment
-
Identifying equipment used for IV administration, and venipuncture including IV cannula, start pack, needleless connector, IV extension set, and securement dressing /device Performing venipuncture on a training arm, secure, and dress the site
-
Hands-on Practical training on simulated models of IV administration and techniques
-
Dos and Don'ts in IV procedure
-
Identifying approaches to take to prevent, detect, and minimize complications
-
Document appropriate information in the patient’s record
-
The procedure for discontinuing the Intravenous Infusion

Alpha Life Trainers is proud to offer Intravenous Infusion (IV) training to people from all healthcare backgrounds, hospitals and employed health care professionals aspiring for skills upgrading or as a part of continuous medical education.
Primary Care and Secondary Care of Administration of Subcutaneous Fluids (Hypodermoclysis or Interstitial), is facilitated by registered nurses (RN) with first hand clinical experience, this ½ day theory and practical based course allows participation in theoretical study, bring examples from practice and underpins or further updates knowledge on safe administration of sub-cutaneous fluids in the Primary Care and Secondary Care environment.
Certification Outline
Be aware of holistic review regarding dehydration prevention
Have knowledge of the warning signs of dehydration
Understand when and why subcutaneous fluids might be used
Have knowledge of fluids that can be given safely subcutaneously
Be aware of the procedure of setting up subcutaneous fluids
Demonstrate the monitoring of the infusion site and related documentation
Demonstrate the process of administration

Aimed At:
Registered Health Professionals on the principles and procedures for the safe administration of subcutaneous fluids to adult patients, for the management of symptoms of dehydration. senior carers or nursing assistants may also benefit from the theory and classroom supervision of safe administration of sub-cutaneous fluids.
Introduction:
The purpose of the Medical Terminology course is to provide an introduction to the professional language used by those who are directly and indirectly involved with the art of healing. The course will also introduce those not currently involved in the health care environment to the language of medicine.
In addition, the course will provide participants with the basics of human anatomy and physiology. Course is for those involved in medical billing, medical coding, medical administration, emergency responders, public safety professionals, and those who wish to gain a more thorough understanding of medical terms and/or enhance the knowledge base they already have.
Who Should Take the Course?
Understanding medical terminology is vital when entering a number of medical professions, including medical billing, medical coding, medical administration, emergency responders, public safety professionals, and those who wish to gain a more thorough understanding of medical terms and/or enhance the knowledge base they already have.

Course Objectives:
Upon completion of the Medical Terminology course, the participant will be able to analyze medical terms, correctly spell medical terms, pronounce medical terms and correctly read passages containing medical terms.
Course Overview:
Bloodborne Pathogens is designed for individuals who may be exposed to blood and body fluids during the performance of their work and who wish to gain a more thorough understanding of bloodborne pathogens, the prevention of occupational exposure, and exposure follow-up.

Who Should Take the Course?
This course is designed for individuals who may be exposed to blood and body fluids during the performance of their work including, but not limited to healthcare professionals, emergency responders, public safety workers, laundry and housekeeping workers.
Course Objectives:
The purpose of this course is to provide participants with the basic ability to recognize the hazards associated with occupational exposure to blood and body fluids; be familiar with the steps to prevent exposure to bloodborne pathogens; and to know the steps that should be taken following exposure to blood and body fluids.
Prevention is key for workplace health and safety.
Protecting the safety of employees is essential to ensure they can work effectively. When workers feel confident that they have the skills and knowledge to keep themselves and others safe, they perform better, and are less likely to require absences from work due to illness.
The Red Cross Preventing Disease Transmission (PDT) online course is designed to help organizations meet public health guidelines, and is suitable to all audiences, including those who work in front-line service delivery, retail, community and social services, and those who work with vulnerable populations.
COURSE CONTENT:
This course focuses primarily on understanding how infection occurs and how participants can use personal protective equipment and good prevention of disease transmission practices to reduce their risk of infection:
- How infection occurs and how it is spread
- Proper hand washing techniques
- Personal protective equipment – proper use, removal and disposal
Our online course has been developed with the latest in evidence-based science from World Health Organization, Public Health Authority of Canada, and the Center for Evidence Based Practice with whom the International Red Cross/Red Crescent works closely.
Flexible, No-Contact Course Delivery
The online course can be completed in approximately 40 minutes and is delivered through a self-directed, online learning platform.
- Flexible – employees learn at their own pace and on their own schedule.
- Learner-focused – course content is presented in a way that is accessible and useful, and incorporates a variety of interactive learning activities and video to keep students engaged in learning.
- Electronic records of training – employees receive a completion certificate that they can download or print to share with their employer.
The Preventing Disease Transmission course is also available in virtual and in-person formats facilitated by a Red Cross First Aid Instructor and includes live demonstration using teaching aids and PPE. Ask us for details!
Introduction:
Transportation of Dangerous Goods (TDG) introduces participants to the TDG Act and regulations and explains the requirements for receiving, handling, transporting and shipping dangerous goods, as well as the appropriate response in emergency situations such as spills or accidents. TDG regulations require that, with few exceptions, all persons engaged in the handling, offering for transport or transporting of dangerous goods be trained in the aspects of handling such goods.

Course Objectives:
Ultimately, the goal of this course is to provide participants with the information they need to comply with the TDG Act and regulations. By completing this course, they should know how dangerous goods are classified; understand the regulations pertaining to proper documentation, safety marks, means of containment, forbidden goods, exemptions and special provisions; and know the immediate reporting and procedures to follow in the event of an emergency involving dangerous goods.